bolt Quick Answer (As of 2026)
A kitchen can have expensive cabinets, beautiful countertops, and high-quality appliances—and still feel poorly designed if the lighting is wrong.
A kitchen can have expensive cabinets, beautiful countertops, and high-quality appliances—and still feel poorly designed if the lighting is wrong.
The problem is usually not a lack of light. It's a lack of the right light in the right place.
A single ceiling fixture may illuminate the middle of the room while leaving countertops in shadow. Standing at the worktop, you can end up blocking the very light you need. Meanwhile, overly bright ceiling fixtures can create glare and make the kitchen feel harsh rather than inviting.
The solution is layered kitchen lighting.
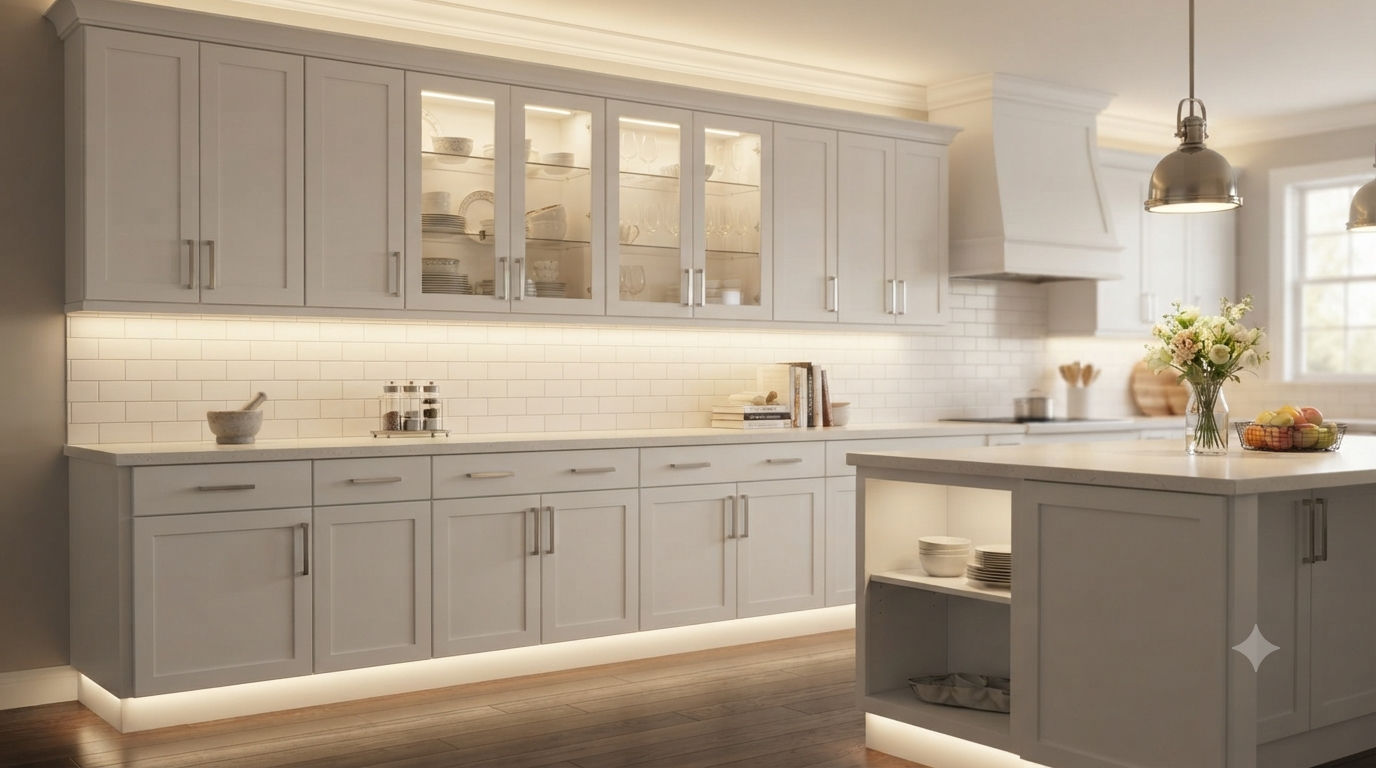
A well-designed kitchen typically combines general illumination from LED downlights or other ceiling fixtures with focused under-cabinet LED lighting. Ceiling lights provide overall visibility, while lights installed beneath wall cabinets illuminate countertops, backsplashes, and food-preparation areas directly.
This approach is more than an aesthetic upgrade. It improves visibility for chopping, cooking, cleaning, and reading measurements while allowing you to create different lighting scenes throughout the day.
This guide explains how to combine lights for kitchen cupboards, under cabinet LED lighting, and led downlights to create a kitchen that is practical, comfortable, energy-efficient, and visually appealing.
The Three Layers of Good Kitchen Lighting
- The most effective kitchen lighting usually consists of three layers
- Ambient lighting — general illumination throughout the room
- Task lighting — focused light for work surfaces
- Accent lighting — decorative illumination that adds atmosphere
The combination is more effective than relying on a single lighting type.
Lighting Layer
- Typical Fixture
- Main Purpose
- Ambient
- LED downlights
- General room illumination
- Task
- Under-cabinet LED lighting
- Countertop and food-preparation visibility
- Accent
- Cabinet strips, toe-kick LEDs, pendants
- Decorative atmosphere
- Decorative/Task
- Pendant lights
- Islands and breakfast counters
- The key principle is simple
Ambient lighting helps you see the room. Task lighting helps you see what you're doing. Accent lighting helps the room look and feel better.
A good kitchen lighting plan uses all three where appropriate.
Why Ceiling Lighting Alone Isn't Enough
Imagine a kitchen with six ceiling downlights.
At first glance, that sounds like plenty of illumination.
But stand at the countertop.
Your body is between the ceiling fixture and the work surface.
The result?
Your own shadow may fall directly across the countertop.
This is a common problem in kitchens.
The ceiling lights illuminate the room, but they don't necessarily illuminate the working plane where you need light most.
That's why under-cabinet LED lighting is so valuable.
The light source is positioned close to the front of the cabinet and directs illumination downward onto the countertop.
Instead of trying to light the work surface from several meters above, you're placing the light source exactly where it is most useful.
What Are Lights for Kitchen Cupboards?
The phrase lights for kitchen cupboards can refer to several different lighting applications.
These include
- Under-cabinet lights
- Inside-cabinet lights
- Above-cabinet lighting
- Toe-kick lighting
- Cabinet strip lights
- Recessed puck lights
- Linear LED bars
Each serves a different purpose.
Under-Cabinet Lighting
Installed beneath wall cabinets to illuminate countertops.
Inside-Cabinet Lighting
Used inside cabinets, particularly glass-front or display cabinets.
Above-Cabinet Lighting
Installed above cabinets to create indirect ambient or decorative illumination.
Toe-Kick Lighting
Installed near the floor beneath base cabinets for a floating visual effect.
For practical kitchen illumination, under-cabinet lighting is usually the highest priority.
Under-Cabinet LED Lighting: The Best Choice for Worktops
LED technology is particularly well suited to cabinet lighting.
LED strips and linear LED fixtures are
- Slim
- Energy efficient
- Low heat compared with traditional lamps
- Available in multiple color temperatures
- Easy to integrate into cabinetry
The goal is to create even countertop illumination rather than a series of harsh bright spots.
For this reason, a continuous linear LED system often produces a more professional result than widely spaced individual puck lights.
LED Strips vs. Puck Lights
Both are common options for under-cabinet lighting.
Feature
- LED Strip
- LED Puck Light
- Light Distribution
- Continuous
- Localized
- Appearance
- Seamless
- Individual light points
- Countertop Uniformity
- Excellent when installed correctly
- Can create bright and dark spots
- Installation
- Requires careful routing
- Relatively simple
- Best For
- Long worktops
- Accent or targeted lighting
- Profile
- Very slim
- Compact
- LED Strip Lighting
A continuous LED strip can provide smooth, consistent illumination across the countertop.
This is particularly useful for
- Food preparation areas
- Long countertops
- Modern kitchens
- Minimalist cabinetry
- Puck Lights
Puck lights create individual pools of illumination.
They can work well for
- Decorative cabinetry
- Glass-front cabinets
- Accent lighting
- Small countertop sections
For primary task lighting, however, a continuous linear system is often easier to make visually uniform.
Where Should Under-Cabinet Lights Be Installed?
Position matters.
If the LED is installed too far toward the back of the cabinet, the front edge of the countertop may remain dark.
If it is installed too far forward, you may see the light source directly, creating glare.
A practical approach is to position the light toward the front half of the cabinet underside, while using a diffuser or suitable optical profile to distribute light evenly.
The exact position depends on
- Cabinet depth
- Countertop depth
- LED beam angle
- Diffuser design
- Cabinet construction
- Pro Tip
Before permanently installing your lighting, temporarily position the fixture and switch it on at night.
Stand at the normal working position.
Look for
- Shadows
- Glare
- Bright spots
- Dark countertop edges
A five-minute test can prevent hours of rework.
Why Diffusers Matter
A bare LED strip can create visible points of light.
This is especially noticeable with lower-density LED strips.
An aluminum LED profile with a diffuser can produce a much cleaner appearance.
It can
- Reduce visible LED hotspots
- Improve visual comfort
- Protect the LED strip
- Help with thermal management
- Create a more finished installation
For high-quality kitchen installations, an aluminum profile + diffuser is often preferable to simply sticking an LED strip directly beneath the cabinet.
Choosing the Right Color Temperature
Color temperature has a major impact on how a kitchen looks.
It is measured in Kelvin (K).
2700K–3000K: Warm White
Creates a cozy, inviting atmosphere.
Good for
- Traditional kitchens
- Evening entertaining
- Warm wood cabinetry
- Accent lighting
- 3500K–4000K: Neutral White
A balanced choice for many modern kitchens.
Good for
- General task lighting
- Food preparation
- Contemporary interiors
- 5000K–6500K: Cool White / Daylight
Produces a crisp, cooler appearance.
Can be suitable for
- Utility kitchens
- Workshops
- Certain commercial food-preparation areas
For many residential kitchens, 3000K or 4000K is a practical starting point.
The most important thing is consistency.
If your ceiling downlights are 3000K but your under-cabinet lights are 6500K, the difference can look visually disconnected.
Should Kitchen Ceiling Lights Match Under-Cabinet Lights?
Usually, yes.
You don't necessarily need every light source in the entire house to have the same color temperature.
But within the kitchen, matching or closely coordinating color temperatures generally produces a more cohesive appearance.
For example
- Ceiling downlights: 3000K
- Under-cabinet LEDs: 3000K
This creates a warm, unified environment.
Another option
- Ceiling downlights: 4000K
- Under-cabinet LEDs: 4000K
This creates a cleaner, neutral appearance.
If you intentionally want different lighting layers, choose the contrast carefully.
Choosing LED Downlights for the Kitchen
LED downlights are popular for kitchen ceilings because they provide focused, efficient illumination without taking up much visual space.
When selecting them, consider
- Lumens
- Beam angle
- Color temperature
- CRI
- Glare
- Ceiling height
- Spacing
- Dimming compatibility
A kitchen is a working environment.
That means CRI deserves attention.
A higher CRI can make food, vegetables, meat, and countertop materials appear more natural and accurate.
For many kitchens, a CRI of 80 or higher is a reasonable starting point. For premium applications where color accuracy matters, higher-CRI products can provide a noticeable improvement.
Beam Angle: The Overlooked Downlight Specification
Two downlights can have identical lumen output but distribute light differently.
A narrow-beam downlight concentrates illumination.
A wide-beam downlight spreads it over a broader area.
For general kitchen illumination, a moderate-to-wide beam can often provide more uniform coverage.
Narrower beams may be useful for
- Accent lighting
- Highlighting architectural features
- Illuminating specific areas
- The correct beam angle depends on
- Ceiling height
- Fixture spacing
- Countertop layout
- Room dimensions
Avoid placing downlights solely according to an aesthetic grid.
The lighting layout should follow the functional zones of the kitchen.
Where Should Kitchen Downlights Go?
The most common mistake is placing every ceiling downlight directly in the center of the room.
Instead, think about where people actually stand.
You may have
- Countertops
- Sink
- Hob
- Refrigerator
- Island
- Pantry
- Walkways
The lighting should support these activities.
For example, if a downlight is positioned too far behind someone standing at the countertop, that person may cast a shadow onto the work surface.
Moving the fixture slightly toward the working zone can improve illumination.
However, don't place ceiling lights so close to cabinets that they create excessive glare or unwanted scalloping on vertical surfaces.
The final layout should be coordinated with the cabinet design before installation.
Kitchen Island Lighting
Kitchen islands often require special attention.
An island may serve as
- A food-preparation surface
- A dining area
- A workspace
- A social gathering point
- You can illuminate it with
- Recessed Downlights
Provide clean, general illumination.
Pendant Lights
Add decorative impact and can provide focused illumination.
Linear Pendant Fixtures
Work particularly well over long islands.
Under-Island or Toe-Kick LEDs
Add a subtle decorative layer.
A popular design approach is to combine
- Ceiling downlights + pendant lights + under-cabinet LEDs
Each layer serves a different purpose.
Task Lighting vs. Ambient Lighting
The distinction is worth emphasizing.
Suppose your kitchen has 1,500 lumens of ceiling lighting.
That sounds bright.
But if the countertop is shadowed, the task lighting is still poor.
Now add 1,000 lumens of well-positioned under-cabinet lighting.
The room may not necessarily feel dramatically brighter overall.
But the working surface becomes much more usable.
This is the advantage of layered lighting.
You're not simply adding more light.
You're putting light where it has the greatest practical value.
Dimmable Kitchen Lighting
Dimming is one of the best ways to make a kitchen more versatile.
During food preparation, you may want bright lighting.
During dinner, you may prefer a softer environment.
Late at night, full brightness may be unnecessary.
A good setup can include separate controls for
- Ceiling downlights
- Under-cabinet LEDs
- Island pendants
- Accent lighting
This allows you to create different scenes.
Cooking Mode
Bright ceiling lights + bright task lighting.
Dining Mode
Reduced ceiling lighting + moderate cabinet lighting.
Evening Mode
Low-level accent lighting + dimmed downlights.
Night Mode
Low-level toe-kick or cabinet illumination.
The key is to use separate circuits or control zones.
If every fixture is connected to one switch, you lose much of the flexibility that layered lighting provides.
Choosing the Right LED Wattage
Avoid selecting kitchen lights based solely on wattage.
For LEDs, lumens are a better indicator of brightness.
For example, a 7W LED downlight from one manufacturer may produce more light than a 9W product from another.
Efficiency depends on
- LED chip
- Driver
- Optics
- Thermal management
For under-cabinet lighting, evaluate the light output per meter when comparing LED strips.
Also consider the total length.
A 5-meter strip rated at 10W per meter consumes approximately
- 50W total
The driver should be appropriately sized for the total connected load, with suitable allowance according to the manufacturer's specifications.
Under-Cabinet LED Drivers and Power Supplies
Low-voltage LED strips commonly require a separate driver or power supply.
The driver should be selected based on
- Input voltage
- Output voltage
- Total LED load
- Dimming requirements
- Installation environment
For example, a 24V LED strip requires a compatible 24V power supply.
Do not connect a low-voltage LED strip directly to mains electricity.
This is an electrical safety issue as well as a product compatibility issue.
Pro Tip
For longer LED strip runs, 24V systems can be advantageous because they generally experience less voltage drop than equivalent 12V systems over the same distance.
For professional installations, calculate the total load and consider voltage drop before selecting the driver and wiring method.
Voltage Drop in Long LED Strip Installations
Voltage drop is a common problem with poorly planned under-cabinet lighting.
Imagine a long LED strip powered from only one end.
The LEDs closest to the power source may appear brighter.
Those farther away may become visibly dimmer.
This can happen because of resistance in the strip and wiring.
Possible solutions include
- Using a higher-voltage strip
- Shortening individual runs
- Powering from multiple points
- Using appropriate cable sizes
- Following the manufacturer's maximum run recommendations
For a professional kitchen installation, don't assume you can simply connect an unlimited length of LED strip to one power supply.
Plan the circuit.
Kitchen Lighting and CRI
Color rendering is especially important in kitchens.
You want food to look natural.
A tomato should look red.
Fresh vegetables should appear vibrant.
Meat should have a realistic appearance.
Countertops and cabinet finishes should also display their intended colors.
A high-quality LED with a good CRI rating can improve the visual experience.
For general kitchen lighting, CRI 80+ is a common baseline.
For premium residential kitchens or spaces where accurate color perception matters, consider higher-CRI products.
Also remember that CRI and color temperature are different.
Color temperature describes whether the light appears warm or cool.
CRI describes how accurately colors are rendered.
Smart Kitchen Lighting
Smart lighting can add another layer of convenience.
Depending on the system, you may control
- Brightness
- Color temperature
- Scheduling
- Scenes
- Voice commands
- Motion activation
For example, under-cabinet lighting could automatically turn on in the evening.
However, smart lighting isn't necessary for every kitchen.
A simple, well-designed dimming system can often provide most of the practical benefits at lower complexity.
The priority should always be
Good lighting design first. Smart controls second.
Technology cannot compensate for poorly positioned fixtures.
A Practical Kitchen Lighting Layout
- Consider a typical kitchen with
- Wall cabinets
- 3-meter countertop
- Central island
- 7-meter ceiling
- A practical approach might include
- Ceiling
Several strategically positioned LED downlights for general illumination.
Under Cabinets
Continuous LED strip lighting along the primary worktop.
Island
Two or three pendant fixtures or dedicated downlights.
Accent
Optional cabinet interior or toe-kick lighting.
Controls
Separate switching or dimming zones for each layer.
This creates flexibility without unnecessarily flooding the room with light.
Common Kitchen Lighting Mistakes
- Mistake 1: Using Only Ceiling Lights
This often creates countertop shadows.
Mistake 2: Installing Under-Cabinet LEDs Too Far Back
The front of the worktop may remain poorly illuminated.
Mistake 3: Using Very Cool Light Everywhere
Extremely cool lighting can feel harsh in a residential kitchen.
Mistake 4: Ignoring CRI
Poor color rendering can make food and surfaces look unnatural.
Mistake 5: Using One Switch for Everything
Separate control zones offer much greater flexibility.
Mistake 6: Ignoring Voltage Drop
Long LED strips can suffer from uneven brightness.
Mistake 7: Choosing Wattage Instead of Lumens
A higher wattage doesn't automatically mean better lighting.
Mistake 8: Forgetting Glare
Visible LED points or poorly positioned downlights can create uncomfortable brightness.
Mistake 9: Installing Fixtures Before Finalizing Cabinet Layout
Cabinet dimensions and appliance positions should be considered before final lighting placement.
Kitchen Lighting Buying Checklist
- Before purchasing lights for kitchen cupboards or ceiling fixtures, check
- For Under-Cabinet Lighting
- LED strip or linear fixture
- Color temperature
- Lumens per meter
- CRI
- Voltage
- Driver capacity
- Dimming compatibility
- Diffuser
- Aluminum profile
- Maximum recommended run length
- For LED Downlights
- Lumens
- Wattage
- Beam angle
- Color temperature
- CRI
- Glare rating or optical design
- Ceiling cutout size
- Installation depth
- Dimming compatibility
- Driver quality
- For the Complete Kitchen
- Ceiling height
- Cabinet layout
- Countertop depth
- Island position
- Work zones
- Switch locations
- Control zones
- Frequently Asked Questions
- Are under-cabinet LED lights necessary if I have LED downlights?
Not always, but they are highly recommended for kitchens where countertops are used for food preparation. Ceiling LED downlights provide ambient illumination, while under-cabinet LED lighting places task light directly onto the work surface and reduces shadows caused by the person working at the counter.
What color temperature is best for under-cabinet kitchen lighting?
For many residential kitchens, 3000K to 4000K works well. Around 3000K provides a warmer, more inviting appearance, while 4000K offers a cleaner, more neutral look. Matching the color temperature of your ceiling lighting usually creates the most cohesive result.
Are LED strips better than puck lights for kitchen cabinets?
For primary countertop task lighting, continuous LED strips or linear fixtures often provide more uniform illumination than individual puck lights. Puck lights can still be useful for decorative applications or targeted areas.
How many LED downlights does a kitchen need?
There is no universal number. The required quantity depends on room size, ceiling height, fixture lumen output, beam angle, layout, and desired illuminance. A good design should position downlights according to functional zones rather than simply spacing them in a uniform grid.
Final Takeaway: Light the Kitchen in Layers
The best kitchen lighting strategy isn't about choosing between lights for kitchen cupboards and ceiling fixtures.
It's about using them together.
LED downlights provide the foundation. They illuminate the room and create general visibility.
Under-cabinet LED lighting handles the critical task-lighting role, putting useful illumination directly onto countertops and reducing shadows.
Pendants, cabinet lights, and toe-kick LEDs can then add decorative and atmospheric layers.
For the best result, think beyond wattage.
Consider
Lumens. Color temperature. CRI. Beam angle. Glare. Driver quality. Voltage drop. Dimming. Fixture placement.
A well-designed kitchen should be bright where you work, comfortable when you relax, and flexible enough to adapt throughout the day.
The winning formula is simple
Ceiling lighting for the room. Under-cabinet lighting for the worktop. Accent lighting for the atmosphere.
When these layers are designed together, even an ordinary kitchen can become a brighter, more functional, and more visually refined space.